The Art of Layered Bulbs
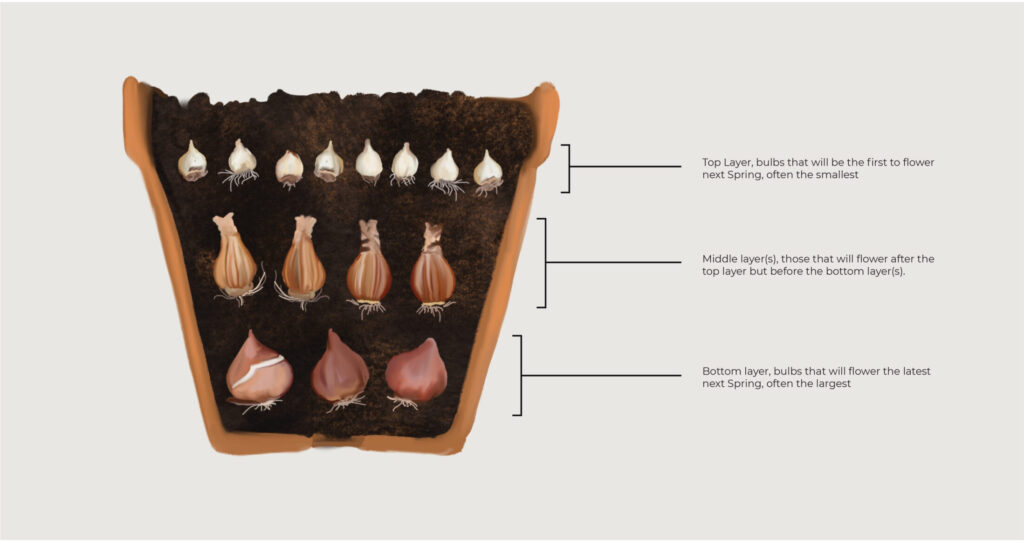
If you’re unfamiliar with the term, it’s simply planting various kind of bulbs in order of their expected bloom time. The idea is to plant the latest blooms deepest and the first to burst through (even snow sometimes!) are only a few inches from the top. Funnily enough, bulb size is directly proportional to the depth of planting and size of eventual flower; which upon reflection is a very easy conclusion to reach, but an interesting fact nonetheless. And while bulbs are forgiving (think of the planting completed by squirrels) to achieve a seamless succession of florals, a bit of planning is needed.
What’s Needed
- A large/deep winterized container with ample drainage (size will depend on how many layers/the size of bulbs you select)
- All-purpose soil + manure for layers and mulch for top-dressing
- 2-8 types of bulbs for your “layers”
- Chicken wire or some kind of pot protection – essential for critter protection and prevention
The Layers
Like other kinds of container planting, you choose your own adventure. If it is your first time utilizing the lasagna planting, consider starting with 2-3 layers with one kind per layer. As you get more comfortable with this method, work your way to 4 layers with 2-3 different bulbs per layer for a truly show-stopping display. Simply arrange your selections based on their required depth and expected bloom time. Earliest will go at the top, latest the deepest. Furthermore, if ever in doubt between two types of bulbs, remember size is a fairly consistent indicator for placement.
- Start with a good amount of soil and mix in a few handful for manure.
- Begin with your deepest planting and arrange your bulbs as accorded by package; some can be packed while others need more initial room. The small hairy roots are placed into the soil, if none appear, the rounder side is usually the bottom. No need to fret if you’re still unsure, the plant will always grow up!
- Cover with a layer of soil and add next layer of bulbs. Continue until all your bulbs are planted.
- Add a thick layer of mulch and finally affix your critter protection. This is essential the digging of various squirrels and rodents could disturb your arrangements or worse rob them of several bulbs.
Julie reminds us, “Aim to create a cohesive yet striking visual appeal with careful consideration not just with type of floral, but with colour, texture and height. I love to work with complimenting colours, singular blooms next to inflorescences and introducing lush scents where possible.”
Emerson Wild Approved Combinations
Springtime Nostalgia
L1: Ruffled tulip of choice + choice of fragrant hyacinth, remember this is the first layer you put in.
L2: Choice of grape hyacinth + choice of snowdrops (which are slightly fragrant).
The Symphony
L1: 2 complimenting colours of Hyacinths.
L2: Choice of Allium + Leucojum, here one will grow very tall, while the other a more standard height enhancing visual appeal.
L3: Double or ruffled daffodil of choice.
L4: Bi- or Tri-coloured Crocus, last bulbs to go in.
Things to Remember
If buying from a catalogue, purchase from a trusted source. When shopping at your local nursery or garden center however, you can easily spot high quality bulbs. To begin with, bulbs should be firm throughout, free from overwhelming mold and have a bit of weight to them. Avoid bulbs that are soft, shriveling or disfigured with any kinds of blemishes or spots. Bigger is often better; with some exception, but usually you’ll want to go for the average or slightly larger if possible.
Keep a detailed description of what you end up planting. Document and journal the process. Note specific cultivars purchases, notes on bulbs and overall performance the following Spring. This little extra step allows for a marvellous natural connection, adding another layer to how you interact with your gardens each year.
May your layered bulbs blooms boldly and beautifully next Spring. While you cozy up during this upcoming season, spend an intentional afternoon reading and gathering inspiration on all things home, gardening and lifestyle on The Wild Blog. Plus, if you don’t already, be sure to follow us on Instagram and Pinterest!


